How to Start Your Vinyl Collection: The Ultimate Beginner’s Guide according to Levantine Music
Why collect vinyl today?
Collecting vinyl ultimately is about building an intimate space with music. If I had to describe my collection somehow, it would be like my first-aid kit; with a perfect album or song for every feeling and occasion. It also resembles a library where each record tells a story. Maybe you also look for refuge in your vinyl collection, like I do, a mirror of your identity. If this feels true to you, stay with me, because I’m going to tell you everything I wish I had known when I first started. Plus, as a bonus, you’ll get a checklist for beginner buyers going into a record store.
My focus is heavily marked by ‘80s/‘90s metal and rock, and my vinyl collection has grown immensely since starting to work with Levantine, because everyone loves vinyl here! In these music genres, editions vary from country to country and label to label; that’s why you’ll learn to look at labels, read back covers, and ask simple questions that protect you. However, you should know I won’t tell you which artists or albums to buy. That’s your decision. Every record has an emotional function, which for me may be different, or even opposite, to yours. In my case, I use rough grunge for days when everything goes wrong, thrash when I need morning energy, or alt-rock when I just want to breathe. A perfect genre for each occasion. That criterion, more than price or rarity, helps me decide what goes on the shelf and what doesn’t. You build your own criterion.
Basic gear made simple
Maybe you want to start collecting vinyl, but you don’t even have the basic equipment. Before knowing what you need, it’s important to understand how sound works on a turntable. I’ll go through it in a simple way like I’m explaining it to my 6 year old niece.
First, we need to read the information hidden in the small circular grooves of the record. But this information is read in motion. For that we use the turntable, which spins the vinyl so it can be decoded.
Then there’s the needle, which “reads” the information from the grooves and converts it into electrical signals inside the cartridge (the part just above it).
Next comes the phono preamplifier (preamp), which makes that electrical signal bigger and corrects it (records are cut with a special curve; the preamp “undoes” it).
Finally, the speakers or speakers + amplifier convert that electrical signal back into sound. Active speakers work by themselves since the amplifier is built in: you just plug them into the power and they play. Passive speakers don’t have power; they need an external amplifier.
What to buy first (without breaking the piggy bank)
Now that you understand how it all works, let’s make it as easy as possible:
A simple and stable turntable (33⅓/45 rpm) with integrated preamp (so you avoid complications). It should have counterweight (a little wheel behind the tonearm) and anti-skate (another wheel/selector that prevents the needle from sliding inward).
MM cartridge (moving magnet) with elliptical stylus: don’t be scared by the name, just think of it as a basic but good needle, period.
Active speakers with AUX/LINE input (or headphones if your gear has a headphone output).
Short cables and a sturdy table: fewer problems, less noise.
It’s also very important to know whether your turntable already has a preamp inside, or if your amplifier includes one. If not, you’ll need an external preamp (a little box that goes between the turntable and the amp/speakers). Before your head explodes, here’s how to know what you’ve got:
If your turntable has a PHONO/LINE switch or says LINE OUT, it has an integrated preamp.
If it only says PHONO OUT and has GND, it does not have a preamp (or it’s deactivated).
And if you’re still not sure, do this quick test:
Connect to AUX/LINE and it sounds very low/thin → you’re missing a preamp (you’re coming out in PHONO).
Connect to PHONO and it sounds extremely loud and dirty → you’re sending LINE into PHONO (two preamps).
Remember, and don’t say I didn’t underline this in red, there can only be one preamp!
How to connect it (step by step)
➔ Turntable (LINE) → AUX/LINE of active speakers.
If your turntable doesn’t have a preamp, you need to put one in the middle, like this:
➔ Turntable (PHONO) → Preamp → AUX/LINE of speakers.
Essential adjustments (no technical jargon)
Leveling: place a bubble level on the platter. If the bubble is in the center, you’re good. Why? If it’s tilted, the needle “slips” and sound quality worsens.
Needle weight (tracking force): this is how much the needle “presses” on the record. It’s set with the counterweight. If it presses too little, it skips; if too much, it wears down. Start at the number recommended by the cartridge (for example, 2.0 g).
Anti-skate: a little push outward so the needle doesn’t drift toward the center. Set the same number as the weight (if you use 2.0 g, set anti-skate ≈ 2).
Quick test: put on a record and listen if a voice sounds “dirty” only from the left or right speaker. If it happens, adjust anti-skate slightly.
Where and how to buy vinyl
If you enjoy digging and discovering gems with your own hands, the record store is your natural habitat. It’s a physical space with box after box of vinyl where you can see and touch each copy, read the back cover, and hold the record up to the light before deciding. The big advantage is you don’t buy “blind”: you check the real condition and, if the seller has a turntable, you can ask for a quick listen of track A1 and a silence between songs to detect noise.
When you want variety in little time, record fairs are a festival. They’re temporary markets where many sellers gather; in a single morning you go through catalogs from several countries, different labels, and editions that rarely appear online. Here, negotiation is part of the game: if you see ringwear, a damaged cover, or a visible scratch, point it out naturally and adjust the price to the real condition.
If you prefer buying from home or checking data with a magnifying glass, online platforms work as a worldwide catalog and a marketplace between individuals and shops. Their big strength lies in price history and edition info: label, country, year, matrices… With two clicks you see if what’s in front of you is a first pressing, a recent reissue, or a color variant, and how much people have paid for it. Ideal to avoid paying a “unicorn price” for something common.
Tricks for buying vinyl
To grow your vinyl collection without nasty surprises, think of your budget like a monthly allowance. Set a clear ceiling, for example, two records per month or a max budget of $60, and stick to it; this way you enjoy every choice more and avoid impulse buys. Keep two live lists: a Top 10 with what you want most (your monthly must-haves) and a watchlist with the same works but in different editions, countries, or labels. When an opportunity shows up in good condition at a reasonable price, you decide without hesitation.
In stores or fairs, negotiate only with data. If the sleeve is torn, there’s marked ringwear, or you see a clear scratch, say it calmly: “I love it, but it has this flaw; could you leave it to me for $X?”. That usually works better than haggling “just because.” Don’t worry, I’ll now show you how to inspect a second-hand record and detect any flaw.
And here’s my favorite trick for finding bargains: as soon as you enter, ask “Do you have recent arrivals of ‘80s–’90s metal/rock?”. They’ll take you to the freshly stocked boxes (sometimes not even labeled yet), where the best stuff is: more options, better condition, and prices not yet “inflated”.
Second-hand vinyl inspection like a pro (strange words explained)
Buying used is where you score best if you know what to look for. Here I’ll show you exactly what to check and what the words mean.
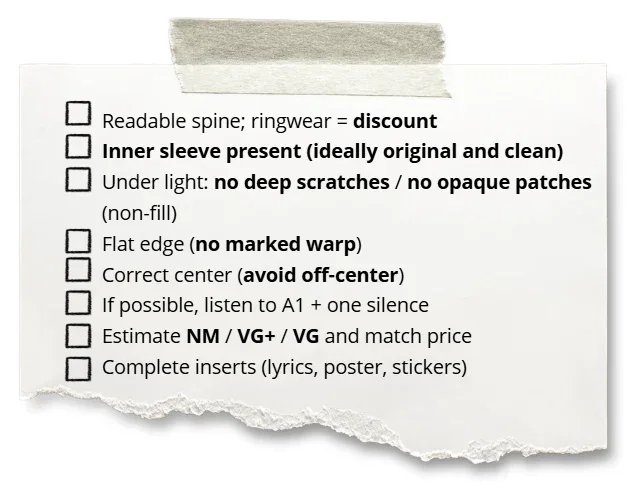
Express inspection in 60–90 seconds
Outer sleeve: check the spine (that title and artist can be read). If you see “ringwear” (a circle marked by pressure), it’s only cosmetic: use it to lower the price.
Inner sleeve (the bag inside): if it’s present and clean, great sign that they cared for the record. If it’s missing or torn, bad sign.
Vinyl under light:
Hairlines = very fine scratches. Sometimes they don’t affect sound.
Deep scratches = you feel them with a fingernail; usually cause clicks or skips.
Warp: rest the edge and spin gently. If you see a clear wave, avoid it.
Center: check the hole. If it’s off-center, the music will sound with pitch fluctuations.
Opaque/pearly areas: could be non-fill (factory defect that sounds harsh). It can’t be fixed.
Mini-listen (if there’s a turntable): ask the seller this: “Can you play me 30 seconds of the first track (A1) and then a bit of the silence between songs?” Because A1 tells you if the record starts clean and centered, and the silence reveals surface noise, non-fill, or groove wear.
Groove wear: this causes distortion in high frequencies (screechy “s” in vocals, “dirty” cymbals). Usually happens from years of playing with a bad needle/weight. Avoid it.
Vinyl grading (what it means in plain language)
Grading is a condition scale used by stores and collectors. It sums up how a record looks and sounds. It’s not 100% exact, but it helps for comparison. Here’s a summary table of what each grade means:
| Grade | How does it look? | How does it usually sound? | Would I buy it? |
|---|---|---|---|
| NM (Near Mint) | Almost new; no visible marks. Clean sleeve. | Very clean; minimal clicks. | Yes, even paying a bit more. |
| VG+ | Small hairlines; sleeve with light wear. | Very good; an occasional click. | Yes, the best balance. |
| VG | Visible marks; sleeve with wear. | Surface noise more present, but still enjoyable. | Depends on price/title. |
| G/Good | Noticeable wear; damaged sleeve. | Quite noisy, possible skips. | Only if very cheap or rare. |
| Poor/Fair | Very bad condition. | Bad listening. | No (except extreme collecting). |